A quote is only as defensible as its breakdown. PartPrice is quoting software for CNC machine shops: it reads a STEP file, builds a line-by-line cost breakdown and produces a PDF quote. If the number on the PDF says $45.85 per piece, an estimator wants to know where $45.85 came from - and a customer who pushes back deserves a better answer than “that’s our price.” This post walks through how PartPrice builds the price of a CNC-milled part, in the order the software does it.
We’ll use one example throughout: an aluminum bracket, 120 × 80 × 25 mm, a few pockets and four tapped holes, 25 pieces. The numbers are illustrative - yours come from your own settings and rate tables. The screenshots are from the current build on a different, smaller bracket (one piece), so their numbers differ from the example.
What is in a PartPrice quote?
Six cost lines per part - material and stock, machining, setup and programming, tooling and consumables, inspection and QC, finish and treatments - plus the lines that belong to the whole order: handling, packaging, expediting, tax. Setup and programming are counted per batch, not per piece. One markup (or margin) number turns cost into price. DFM flags sit next to the lines, and every rate behind them is visible - and editable in the Excel export.
1. Read the geometry
Everything starts with the STEP file. PartPrice measures the part - bounding box, volume, surface area - and recognizes the features that will need machining: holes with their diameter, depth and thread, pockets, bosses, the faces that have to be cut. The 3D viewer shows what was recognized, so you can see what the estimate is based on before you decide whether to trust it.
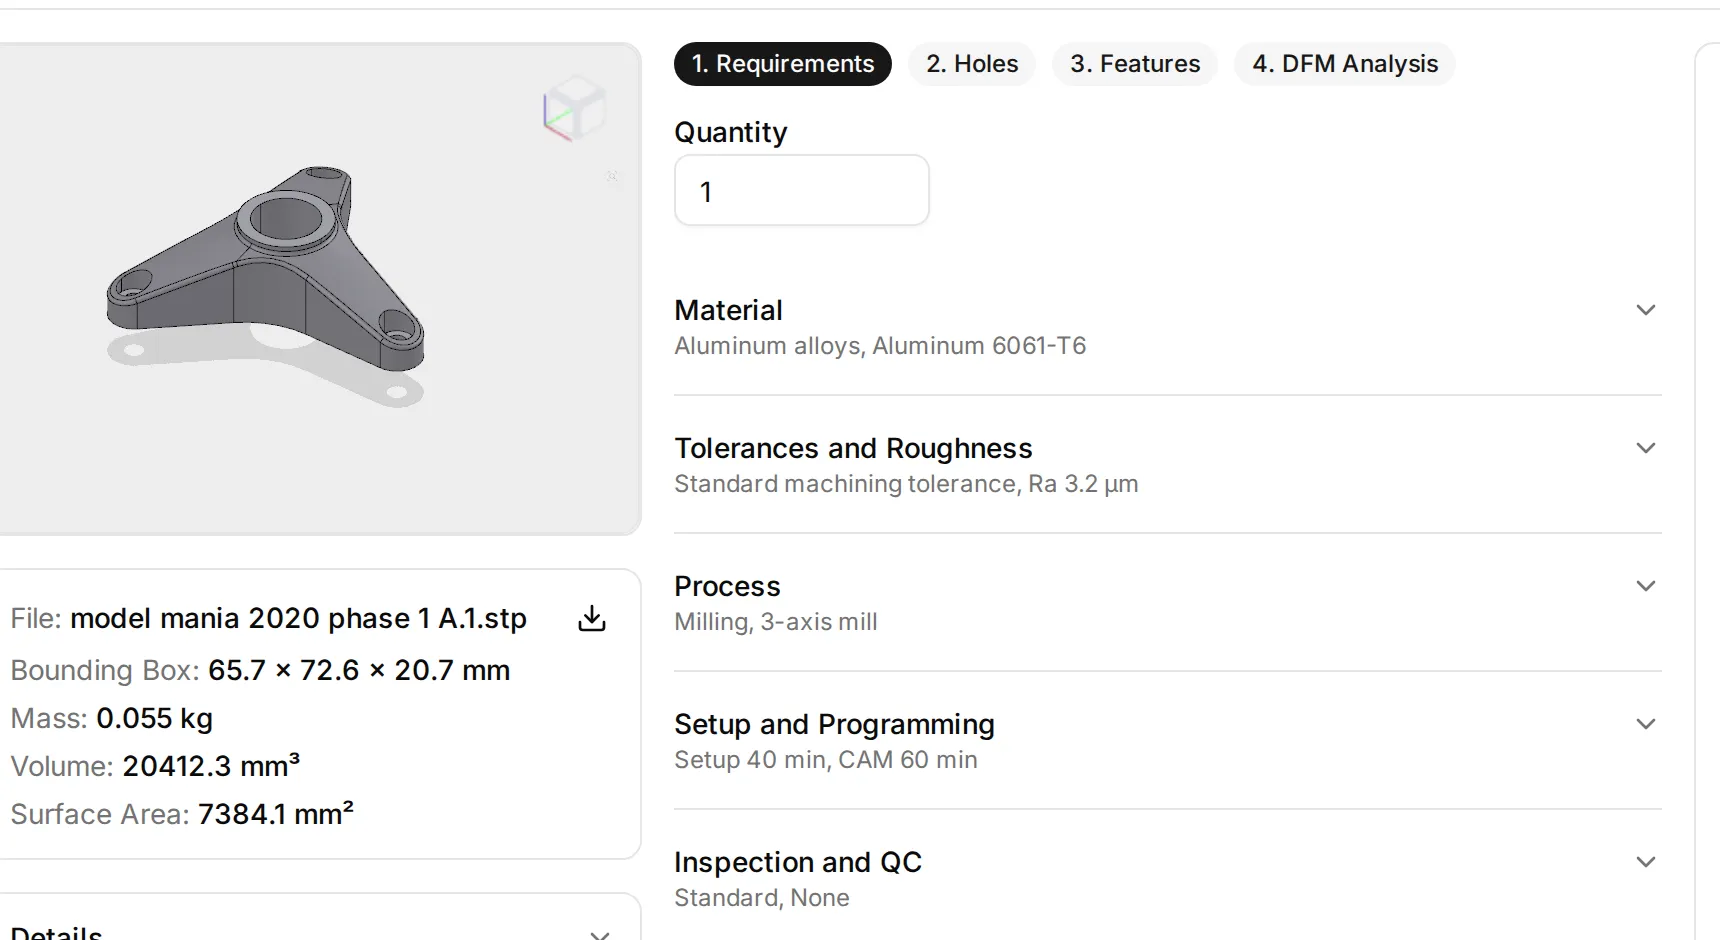
The part as PartPrice sees it: the model in the viewer and the measurements the rest of the estimate is built on.
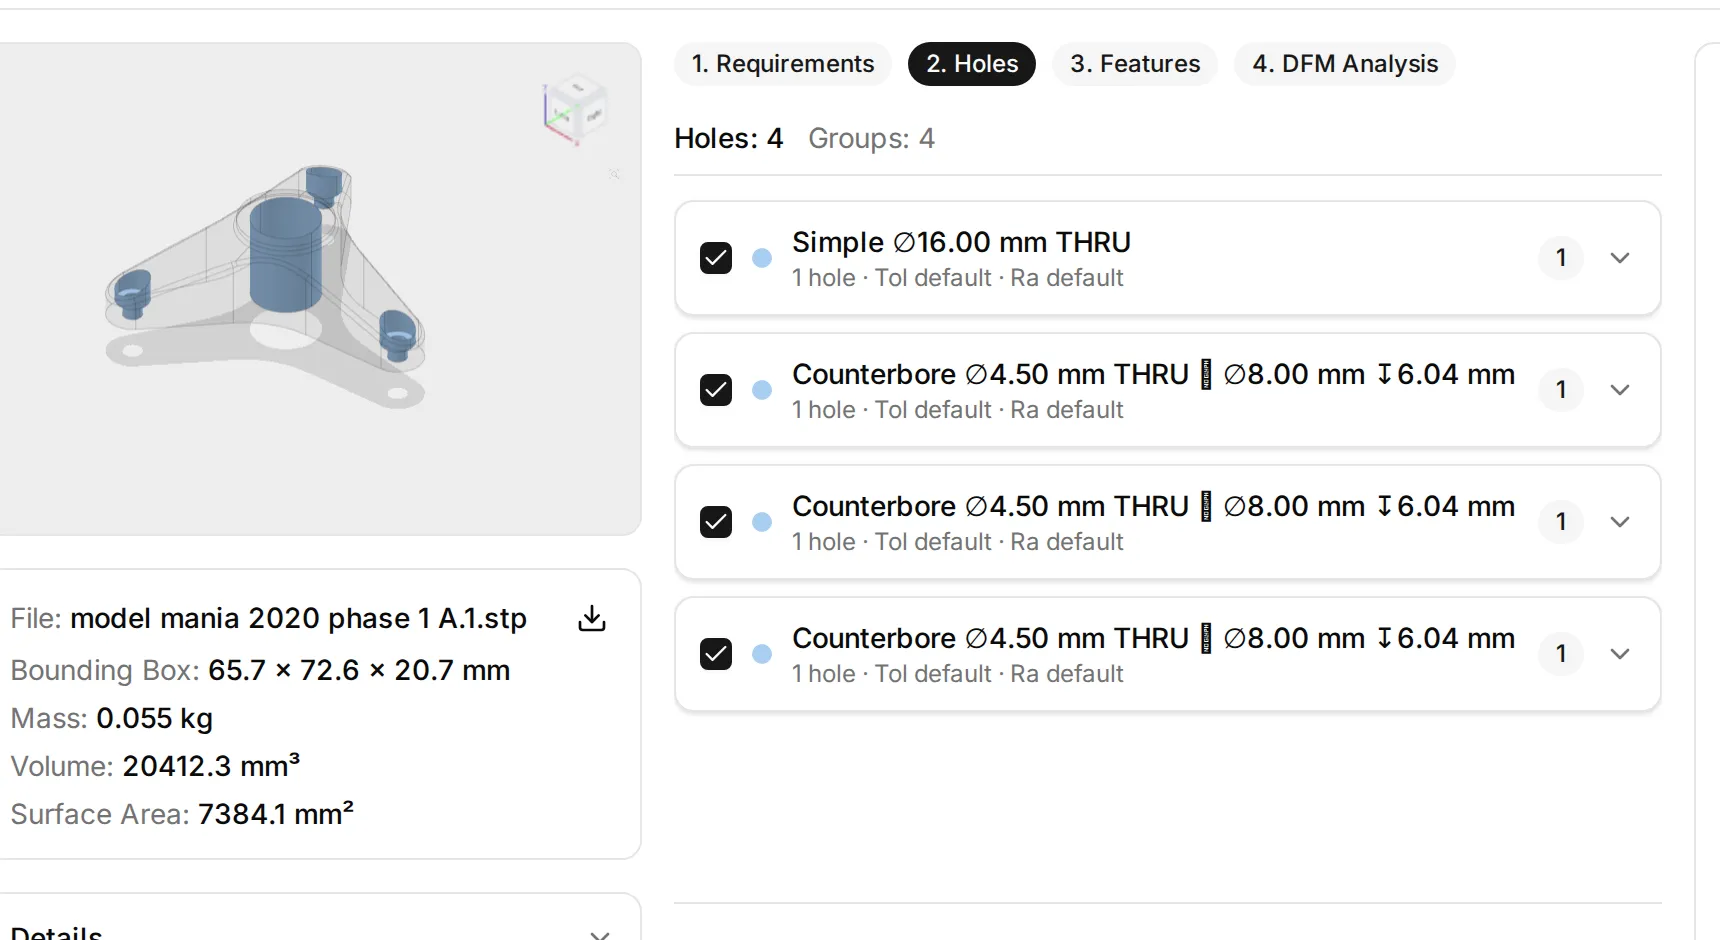
Recognized holes, one line each: type, diameter, depth, counterbore. Each gets its own machining time later.
2. Size the stock
A milled part starts as a block. PartPrice takes the bounding box, adds clearance to the cut length (you set the default) and picks the next standard cross-section from the stock sizes you keep. The bracket becomes a billet a little bigger than the part in every direction - and that billet, not the finished part, is what you pay the material supplier for.
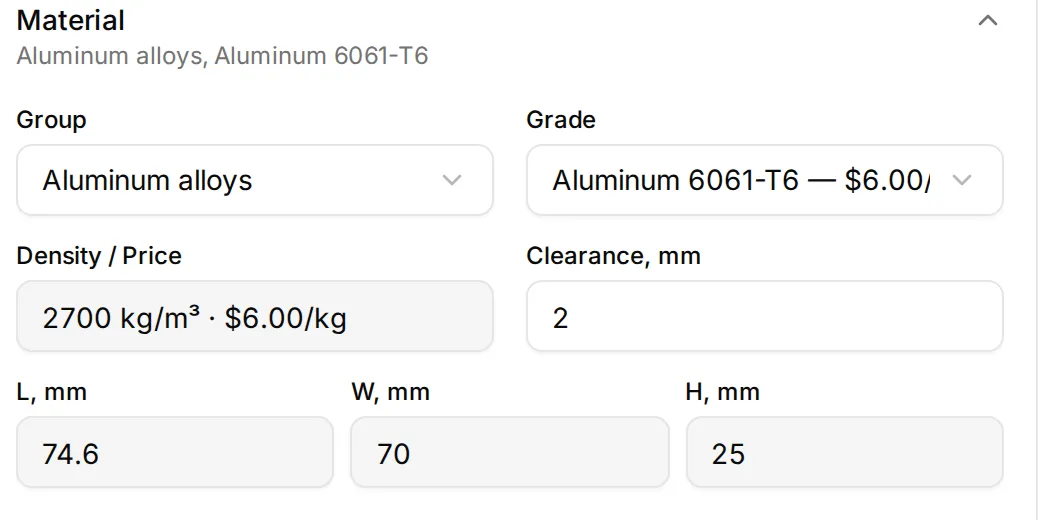
Material and stock for the screenshot bracket: 72.6 mm of part plus 2 mm of clearance gives 74.6 mm of stock length; width and height snap to the next standard sizes, 70 and 25 mm.
The difference between stock volume and part volume is the material that has to be removed, and that number drives most of what follows. It is also why a part with a tall thin wall on a wide base costs more than its final weight suggests: a lot of expensive metal turns into chips.
3. Material and stock
Stock volume × density × the material price on file, plus a yield factor for the offcut you can’t use. In aluminum the line is small; the same bracket in titanium is not, and the line shows it immediately - before anyone has spent an hour on the rest of the estimate.
4. Machining time
For most parts this is the largest line. PartPrice splits the removed volume by how it is removed - drilling for the recognized holes, milling for everything else - because each has its own model. Roughing time is the volume to remove divided by a removal rate for the material and strategy; finishing time is the surface to finish times a finishing rate; holes are timed by diameter, depth and type (drilled, tapped, reamed, counterbored). Tool changes and other in-cycle overhead are added on top.
It is a rate-based estimate, not a toolpath simulation - that is what makes a 30-second estimate possible, and the rates are visible and editable. A complexity level from “very simple” to “very complex” scales the times. You pick it - or keep the default - from what the flags show: how much stock comes off, deep pockets, thin walls, how many orientations the part needs.
Machining time × the hourly rate of the machine you chose = the machining line.
5. Setup and programming - per batch, not per part
CAM programming is paid once per batch; fixturing, the work zero and the first-article check once per setup - not per piece. A bracket that needs a second setup (flip it to machine the back) costs real money at 5 pieces and almost nothing extra at 500. PartPrice keeps these lines per batch, so the unit price falls with quantity the way it does on your shop floor.
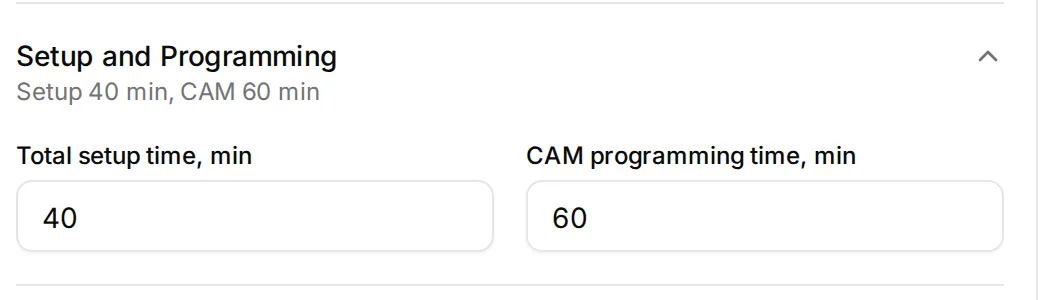
Setup and programming are two numbers you can see and change. For one piece they dominate the price; at 25 pieces they fade into the background.
6. Tooling, inspection, finish
Three smaller lines:
- Tooling and consumables - the wear share of inserts, drills and taps, plus coolant. Many shops fold this into the machine rate; in the export you can zero it and do the same.
- Inspection and QC - per-part measurement plus a per-batch QC setup, scaled by the tolerance class you chose and the part’s complexity.
- Finish and treatments - anodizing, bead-blasting, plating and the like, usually with a minimum charge per batch.
7. From cost to price
The six lines add up to the cost of the part. Your markup - or your target margin, whichever way you think - turns cost into price. In the example, 30% on top of an $881.76 cost for 25 pieces gives $1,146.29, or $45.85 per piece. It is one number, visible on every quote and yours to change.
At the quote level, PartPrice adds what applies to the whole order - handling, packaging, expediting, tax - and prints the total, the validity date and your terms on the PDF.
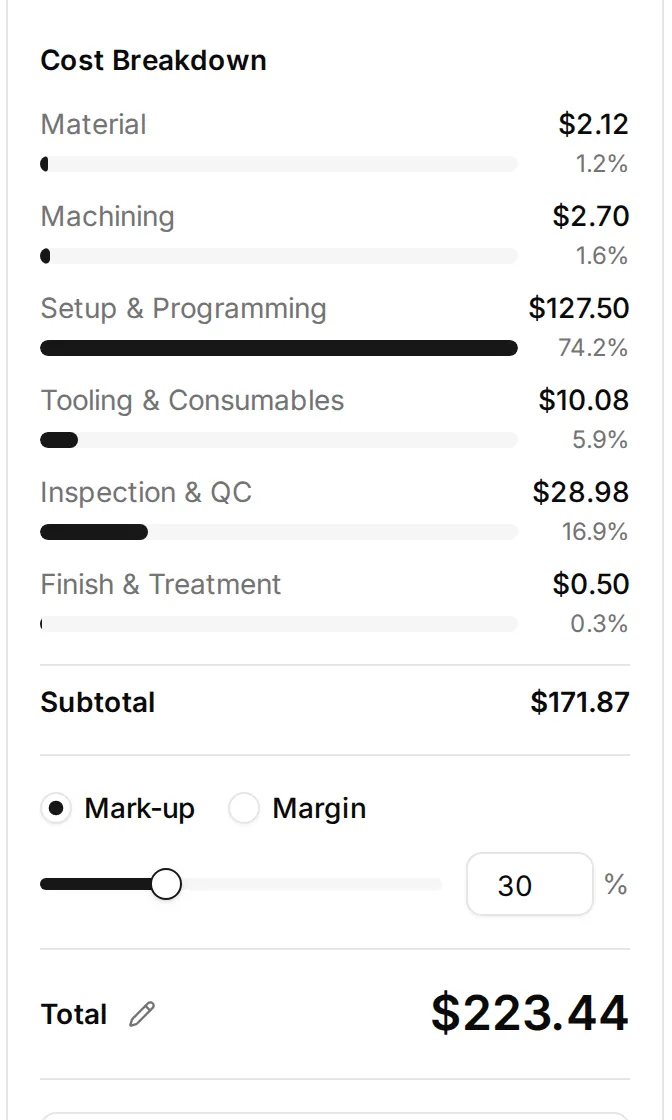
The breakdown for one piece of the screenshot bracket: setup and programming are 74% of it, which is exactly what a one-off part looks like. The pencil next to the total is the manual override.
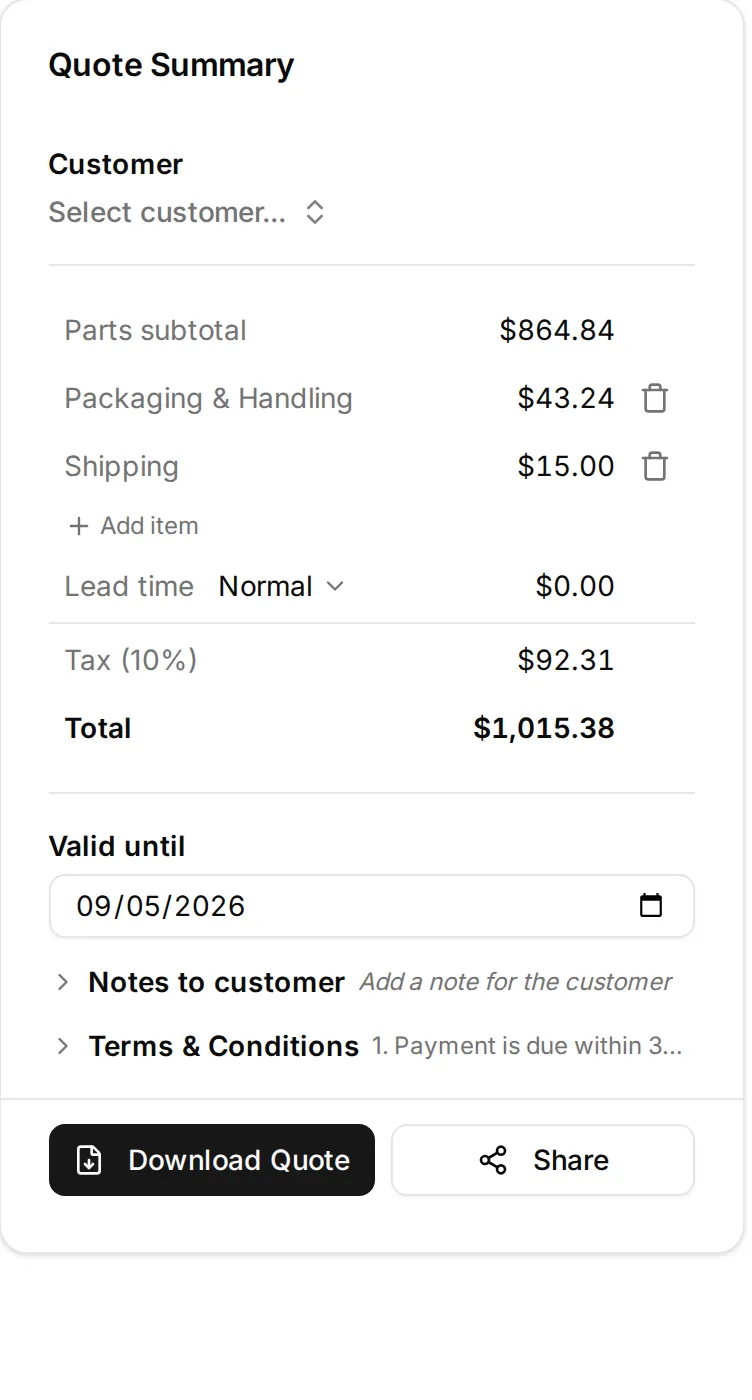
The quote level: the parts subtotal plus the lines that belong to the whole order, then the validity date, terms and the PDF.
8. The flags next to the numbers
While it prices the part, PartPrice also flags what will be hard: a hole many diameters deep that will want a peck cycle or a special drill, thin walls that will chatter, a pocket deeper than the cutter likes, features that force an extra setup. The flags don’t change the arithmetic - today they are information, shown on the model. They tell the estimator where the risk is and what to look at before committing to the number, which is often more useful than the price itself. The part you shouldn’t quote at all is the cheapest one to catch early.
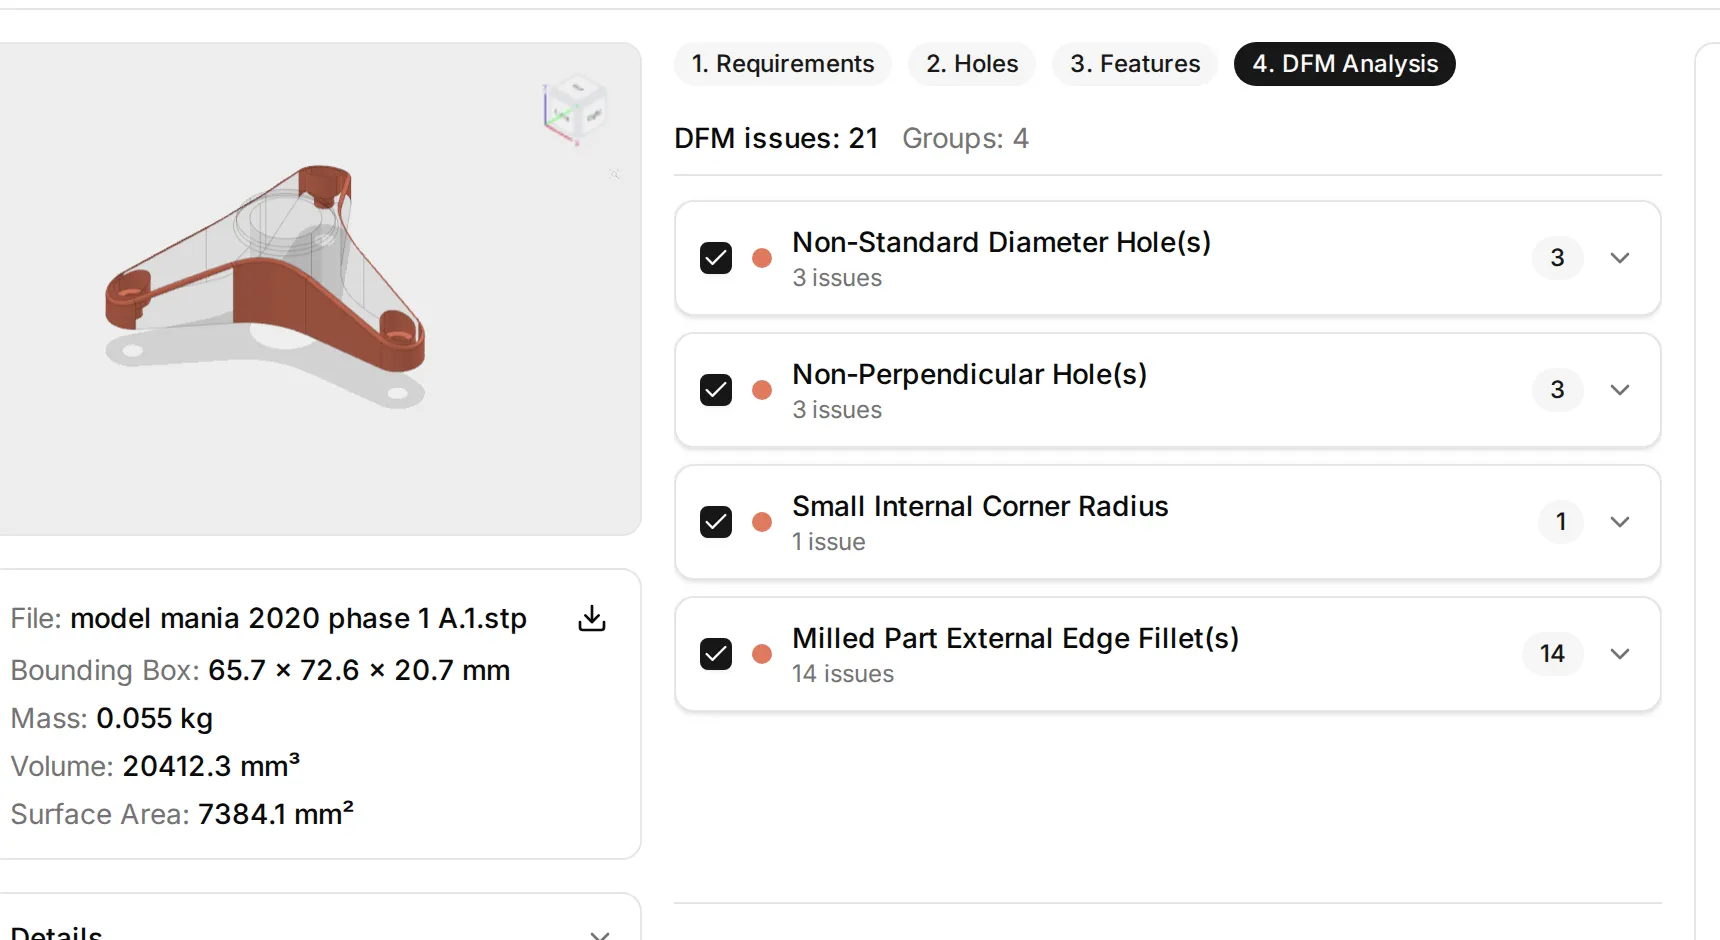
DFM findings for the screenshot bracket: grouped, counted and highlighted on the model. Fourteen of the 21 are external edge fillets, which is a good example of a finding you read and move on from.
What you can change
Everything above runs on numbers you can see. Per part: machine, setups, material, stock, tolerances, finish and markup; company defaults apply to every new part. The rate tables behind the times and prices are listed in your settings - and editable in the Excel export, formulas included. Shop-specific rate tables are on the roadmap. And when the estimate is still wrong for a part - it happens, and you’ll know it before the software does - type your own price over it. The quote and the PDF take your number.
If you want to see the arithmetic itself, download the Excel export - the formulas are in the cells, not hidden in our code. Two files from a real sample part show what leaves the shop and what stays inside: the quote as the customer gets it (PDF, one page) and the calculation behind one of its parts (Excel, eight sheets, formulas included).
That is the point of the breakdown. The number is not an oracle. It is a starting estimate you can defend line by line - or correct, because you can see every line.
What’s next
Today this works for CNC milling from STEP files. No dates for the rest - we’d rather ship than promise - but this is the order we’re working in:
- Turning. The second process, with its own time model: the same breakdown for turned parts.
- Your shop’s rate tables. Machine rates, material prices and removal rates calibrated per shop, inside the app rather than only in the Excel export.
- Measuring on the model. Distances, diameters and wall thickness straight in the 3D viewer, so nobody opens CAD to check one dimension.
- Sharing a quote by link. A web version of the PDF that the customer opens in the browser, with the same terms and validity date.
- More CAD formats and more seats. Native SolidWorks and Inventor files; several estimators in one company.
- Sheet metal and injection molding. Later - the cost models are different enough to deserve their own posts.
If one of these decides whether PartPrice is useful for you, say so in the early-access form - that is how the order gets set.